Installation wizard
The steps for installation will vary based on whether you plan to use an all-in-one server (generally used for small instances) or a separate server for the application and the database (big instance with over 1000 devices). Please select the appropriate section below based on your installation type.
The installation requires Navixy platform distribution package. It can be downloaded directly to the server using the following command:
wget --content-disposition https://get.navixy.com/latestAfter the package is downloaded, you can proceed with the installation.
Option 1. All-in-one server
First, unpack the Navixy platform build provided as a tar.gz archive. Go to the directory with the archive and run the following command for unpacking it (of course replace <PACKAGE_NAME> with the actual file name):
tar -zxvf <PACKAGE_NAME>.tar.gzThe archive will be extracted to /navixy-package directory. Then, open this directory and run the installation script from it:
./install.shThe script will check the OS compatibility and other pre-requisites. No action is needed from you a this stage.
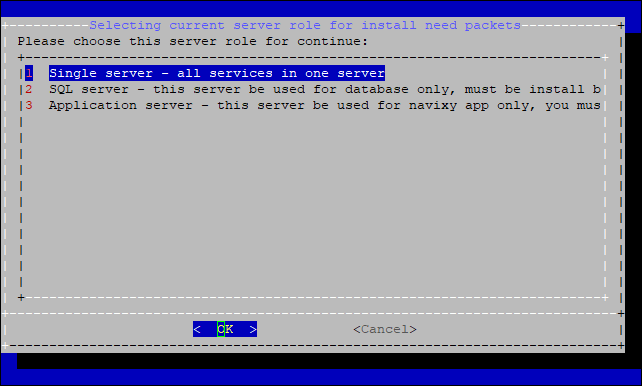
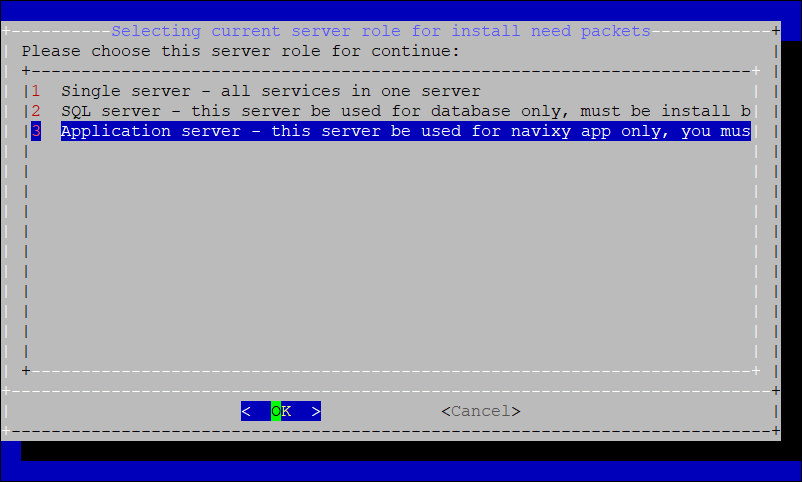
Select the server role
You will be asked to select the server role for further deployment. You need to select Single server - all services in one server. Be careful not to click other options as they are supposed to be used for two-server deployment.
Installation process
The script will make a software check. You will see that the software is being installed, including Java, Nginx and MySQL. You will see a request to restart MySQL, confirm this by entering 1. Next, you will be asked to confirm databases initialization, answer affirmative again by entering y.

MySQL will ask you to specify the root password. It is not mandatory for the platform so you can leave it blank. If you specify any, be sure to remember it. Next, the script will create databases and the DB user navixy with random password. This will be the main user for the platform services to interact with the database. However, you do not need to remember its password as it will be automatically inserted into the configuration files. After this is done, the script will populate the database with system tables.

After the database initialization, the script will ask the following:
This script will install Navixy platform on this server. Continue? (y/n)Answer affirmative with y, and it will do the following:
Create user for Java services (backend)
Make the Java services directories and populate them with the required files
Copy and configure web components (frontend)
Copy runit scripts required for running Java services
Configure Java services
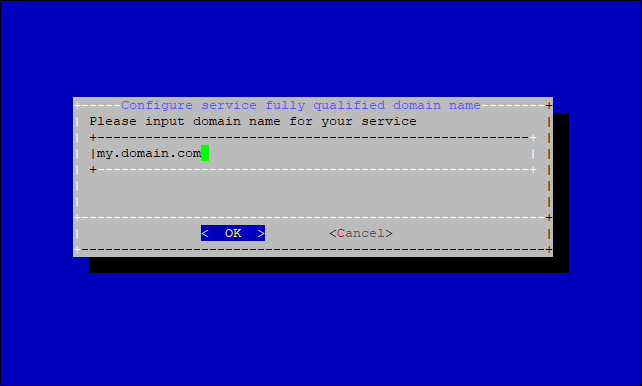
Domains
The script will ask you to specify a domain name for your service. This is a domain used for:
All the system services in one-domain installation.
User interface and devices activation in three-domain installation.
Next, you will be asked for API and Admin panel domains.
For one-domain installation, leave these values blank and press Enter (OK).
For three-domain installations, specify API and Panel domains accordingly.

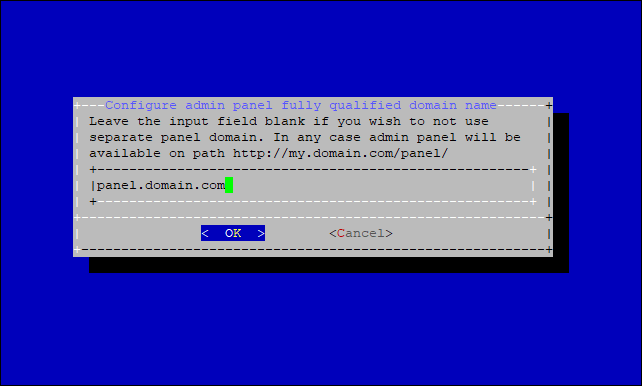
You will see a notification about the domains configuration you have made.
Next, you will be prompted to perform the installation of SSL certificates for your platform. If this is what you want to do, click Yes and follow the wizard prompts.
For details on installing the SSL certificate, see the Configuration wizard page.
At this point, the basic platform installation is complete. If you need more customization, use the ./configure.sh script.
Option 2. Two servers
First, unpack the Navixy platform build provided as a tar.gz archive. Upload and unpack the archive to both servers. To perform unpacking, go to the directory with the archive and run the following command (of course replace <PACKAGE_NAME> with the actual file name):
tar -zxvf <PACKAGE_NAME>.tar.gzThe archive will be extracted to navixy-package directory. The following installation must be done first on the database server and second on the application server.
Database server
Open /navixy-package directory and run the install.sh script from it.
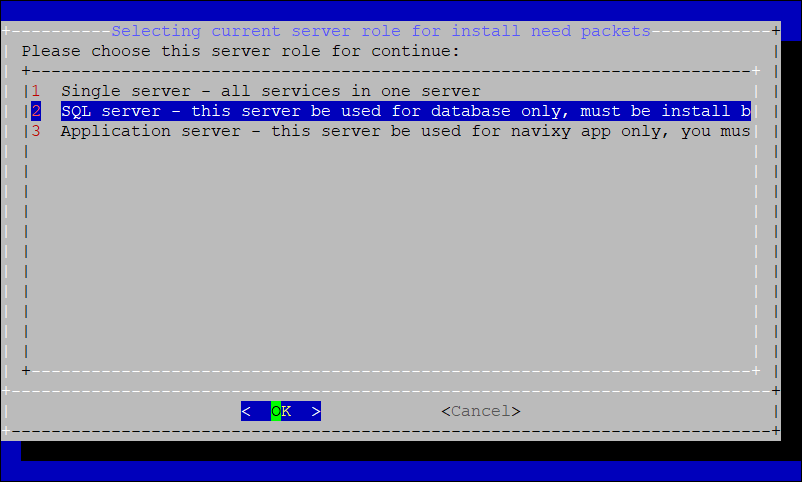
./install.shYou will be asked to select the server role for further deployment. Select #2 SQL server.
The script will begin with a system and software check. You will see that MySQL is being installed and configured. You will see a request to restart MySQL, confirm this by entering 1. Next, you will be asked to confirm databases initialization, answer affirmative again by entering y.

MySQL will ask you to specify the root password. It is not mandatory for the platform so you can leave it blank. If you specify any, be sure to remember it. Next, the script will create databases and the DB user navixy with random password. This will be the main user for the platform services to interact with the database.

The script will then populate the database with system tables. After the database initialization, you will see the following information regarding the database server:
Username: navixy - this is the DB user specified in system configs for the database interaction.
Password: random - the password for navixy user.
IP address: your DB server actual address.

Be sure to save these values, as you will need them during the application server installation.
Application server
Open /navixy-package directory and run the install.sh script from it.
./install.shYou will be asked to select the server role for further deployment. Select #3 Application server.
The script will download and install Java, Nginx and other pre-requisites to run the platform. This will be done automatically and does not require your attention. After all the pre-requisites are installed, the script will ask you for SQL server user password. This is navixy user password that you obtained after installing the database at the previous step. Use Shift+Insert to paste it from the clipboard.

You will then be prompted for the IP address of your database server. Enter it.

The script will make sure that the IP is valid. You will then be asked to confirm the platform installation on your server.
Do this by typing y and pressing Enter.

Domains
The script will ask you to specify a domain name for your service. This is a domain used for:
All the system services in one-domain installation.
User interface and devices activation in three-domain installation.
Next, you will be asked for API and Admin panel domains.
For one-domain installation, leave these values blank and press Enter (OK).
For three-domain installations, specify API and Panel domains accordingly.
You will see a notification about the domains configuration you have made.
Next, you will be prompted to perform the installation of SSL certificates for your platform. If this is what you want to do, click Yes and follow the wizard prompts.
For details on installing the SSL certificate, see the Configuration wizard page.
At this point, the basic platform installation is complete. If you need more customization, use the ./configure.sh script.