Dockered installation
The Dockered Navixy solution is specifically designed to simplify and expedite the platform installation process. To get started, all you need to do is make the required configuration changes, execute a few commands, and patiently wait for the installation to complete.
This guide will walk you through the step-by-step process of installing the Dockered solution on a Linux server. While we highly recommend Ubuntu for its user-friendly operation and administration, rest assured that any up-to-date Linux distribution is suitable for the installation. Feel free to choose the one that suits your needs best.
Please note that the installation requires elevated privileges. In the instructions provided below, the installation is demonstrated using the root user. Alternatively, you can also perform the installation using the sudo command.
Step 1 - Install Docker and download Navixy build
To prepare for the deployment of the Navixy dockered platform, you can follow these commands.
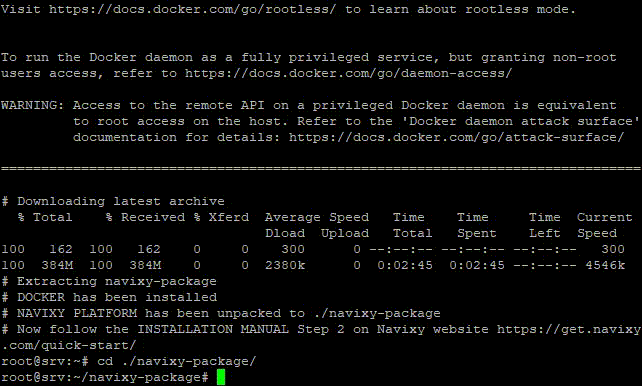
The initial command will download the installation script for the Navixy On-premise platform to your server. The subsequent command will execute this script, which will install Docker and fetch the most up-to-date version of the platform distribution package.
curl -fsSL https://get.navixy.com -o install-navixy.sh
sh ./install-navixy.sh
The script verifies whether Docker is installed on the server. If Docker is detected, the script will display a message about it and take a pause. This is done to prevent inadvertent deployment on servers where Navixy is already installed.
If the installed Docker is not related to Navixy, just wait a while and the script will continue its operation.
You will see the installation process of Docker, after which the platform package distribution will be unpacked.
After the script completes its work, it will report success and display a link leading to the current page.
Further, you need to specify license key and necessary settings, and then deploy the platform as described in the next section.
Step 2 - Deploy Navixy platform
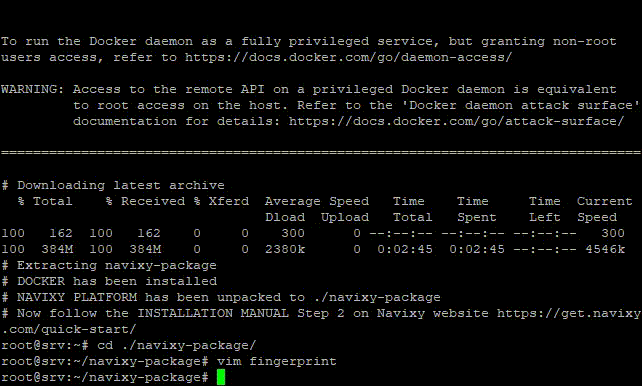
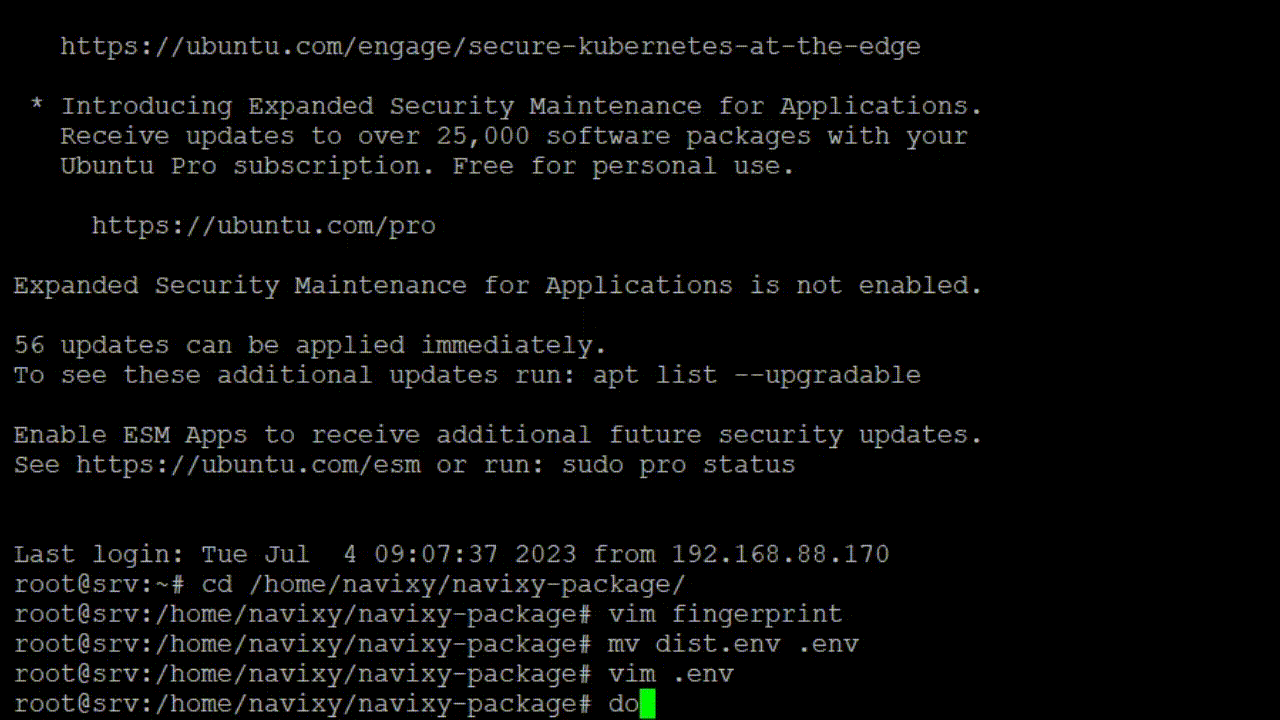
Open the newly created “navixy-package” directory

Edit a file named fingerprint inside the directory. Put your license key in it and save the file. The installation script will use this file to add the license to the database.
Without fingerprint the platform will not be able to function properly.
Find and edit a file named .env. Specify the following values:
navixy_passwd- a password for database user (can be auto-generated with some third-party tool).service_domain- domain of your platform, which will be used by users and for registration of trackers.api_domain- domain of API service (optional - not required for one domain installations).panel_domain- domain of API service (optional - not required for one domain installations).WORKDIR- service directory used to store configuration files, log files and other system files.The default WORKDIR is
.../navixy-package/work/(inside the unpacked Navixy distributive). If not changed, the platform will be installed to this directory.
Run the installation script. When in navixy-package directory, run the following command:
docker compose up -dInstallation may take a few minutes, depending on server performance. You will see the installation progress on the screen, but no action is required from you, just wait for the script to complete.
Step 3 - Check the platform operation
After installation, the platform containers will start automatically.
Open the admin panel. The access link will depend on the contents of the .env file and will be one of the following:
panel_domainservice_domain/panel
The default login and password are admin.
If you have successfully logged into the platform, change your admin password in Service preferences menu.
The installation process is now complete.
If you require further guidance on using and configuring the platform, or if you encounter any technical issues, please don't hesitate to reach out for assistance contacting Navixy technical support.