BLE fuel level sensors (Teltonika)
Many Teltonika GPS devices support wireless Fuel sensors that connect via Bluetooth. The advantages of using these Bluetooth fuel sensors are significant:
No wires: The sensor and tracker do not need a physical connection, simplifying installation.
Independence from external power sources: These sensors come with a built-in battery that can last for several years without the need for recharging.
Additional data: In addition to fuel levels, the sensor also transmits data on temperature, humidity, and the battery charge level.
GPS device preparation
To prepare your Teltonika GPS device for Bluetooth fuel sensor integration, follow these steps.

Download the Teltonika configurator: Obtain the app from the official Teltonika website.
Update the firmware: Ensure that your device is running the latest firmware version.
Run the configurator:
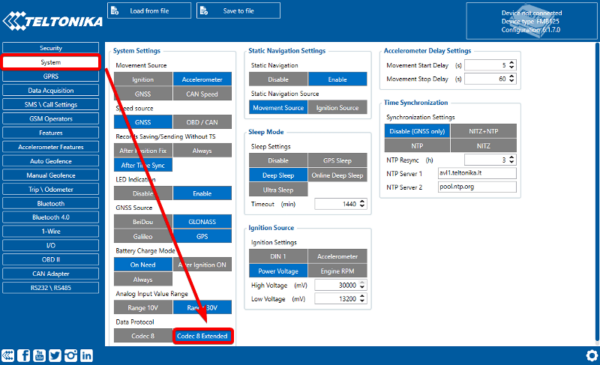
Go to the System tab.
Change the data transfer protocol to Codec 8 Extended.
Connect the fuel sensor:
Navigate to the Bluetooth tab in the configurator.
Connect the fuel sensor to the tracker.
Enable the necessary parameters:
Go to the I/O tab.
Ensure that the parameter corresponding to the fuel sensor is enabled.
Codec 8 Extended is a Teltonika’s proprietary communication protocol that supports up to 65,535 data parameters (AVL IDs), allowing for more detailed data transmission compared to the standard Codec 8, which supports only 255.
Sensor setup on the Navixy platform
Once the tracker is connected and transmitting fuel data, follow these steps to set up the corresponding sensors on the Navixy platform.

Create a new measurement sensor:
Navigate to Devices and settings → Sensors and buttons.
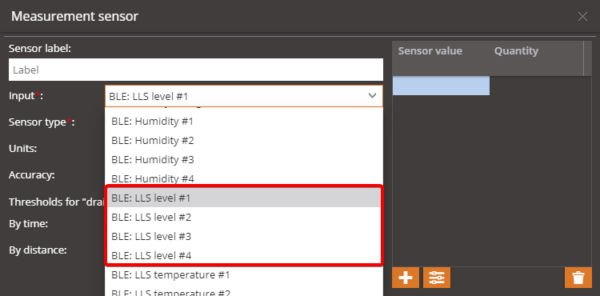
Click Create a new measurement sensor.
Configure the sensor:
Select the input labeled "BLE: LLS level".
Set the sensor type and units. If necessary, fill in the calibration table and adjust other settings.
Repeat for additional sensors:
If you have multiple fuel sensors, repeat the setup process for each sensor, selecting the appropriate input for each.
Monitor and report:
Once configured, you can monitor the fuel level in the designated widget on the platform.
You can also generate detailed reports on fuel consumption.
This setup allows you to fully utilize the capabilities of Teltonika Bluetooth fuel sensors, providing accurate and real-time data on fuel levels, temperature, and more.
