Google maps and geocoding
To use Google Maps with Navixy On-premise, you have to obtain valid Google Maps API keys. This documentation page provides a step-by-step guide on how to create Google Maps API keys and configure them for use with the Navixy platform.
The guide will walk you through the process of setting up a Google Cloud Console account, creating a new project, generating the necessary API keys and applying them to your Navixy instance configuration. By following this guide, you will be able to easily integrate Google Maps with Navixy On-premise and take full advantage of the platform's advanced mapping features.
Creating Google API keys
To create Google API keys for use with the Navixy platform, please follow the guide below. Please note that Google API keys are associated with your account and are subject to Google's API usage policy. For more information, please refer to the links below:
Setting up account and project
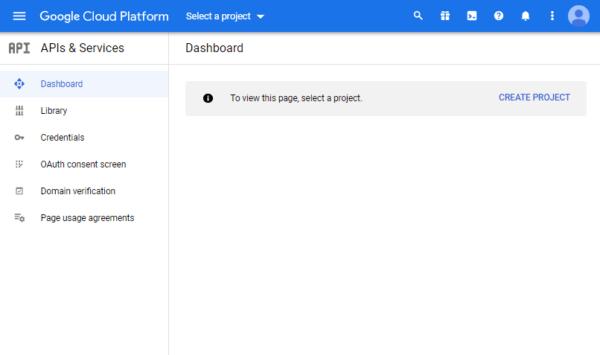
Navigate to the Google Cloud Console webpage and log in using your Google account credentials. If you do not have an account, you can create one.
API keys are created within a project. If you already have a project, you can choose it from the list. If you do not have any existing projects, click "Create project" to create a new one.
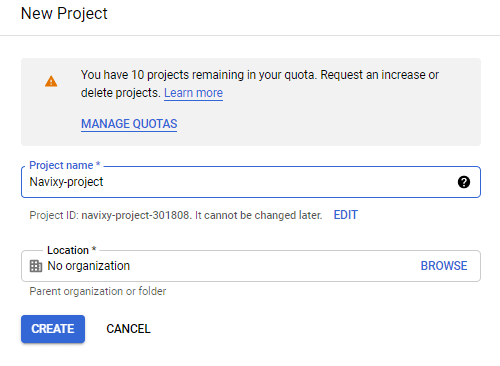
Name your project appropriately and click the "Create" button to create a new project
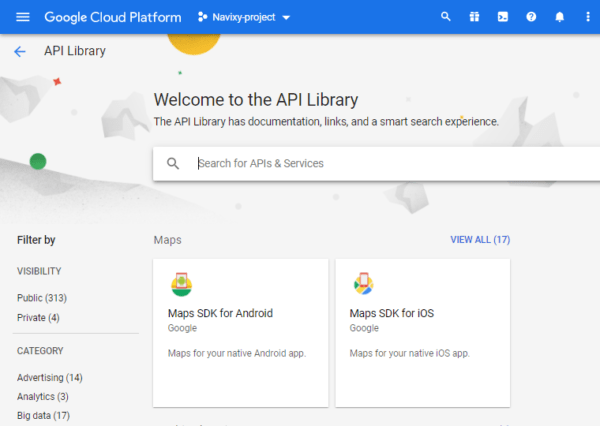
Ensure that your newly created project is selected and click “Enable APIs and Services”. You will be taken to Google API library.
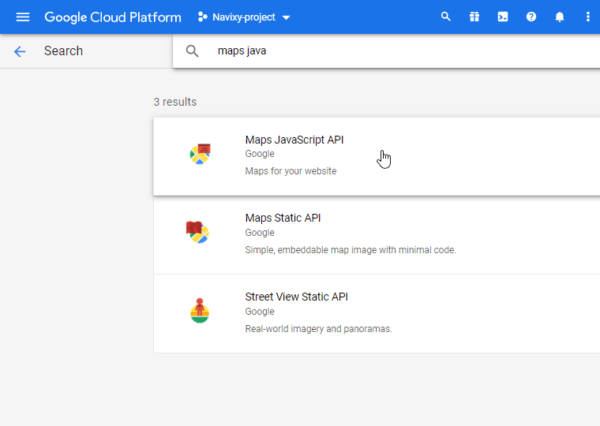
Type the name of the API you need, select it and click “Enable”. In this case we are adding Maps Javascript API (used for google maps)
Repeat the process for APIs you need. Navixy utilizes a total of 5 APIs:
Google Maps JavaScript API - Google maps in UI
Google Maps Geocoding API - Geocoding
Google Maps Geolocation API - LBS point processing
Google Maps Directions API - Route creation
Google Static Maps API - Static maps in email

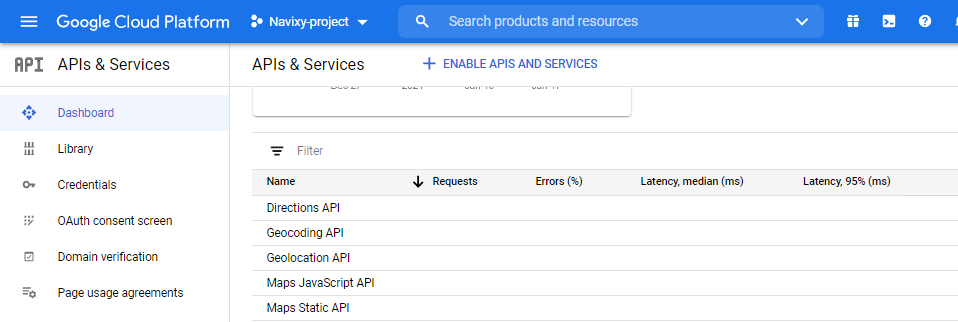
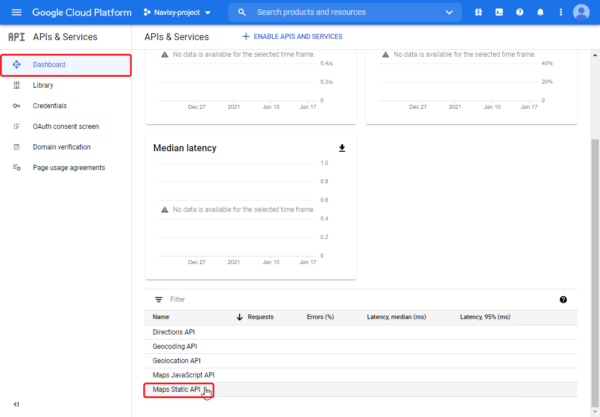
Ensure all enabled APIs are displayed in your dashboard:
Generating Google keys
To enable the full range of Navixy functionality, you will need a total of three API keys:
Key #1 for displaying maps in the user interface
Key #2 for accessing GIS services (geocoding, routing, and geolocation)
Key #3 for displaying static Google Maps in email notifications
Generating Google key #1 for Maps in UI
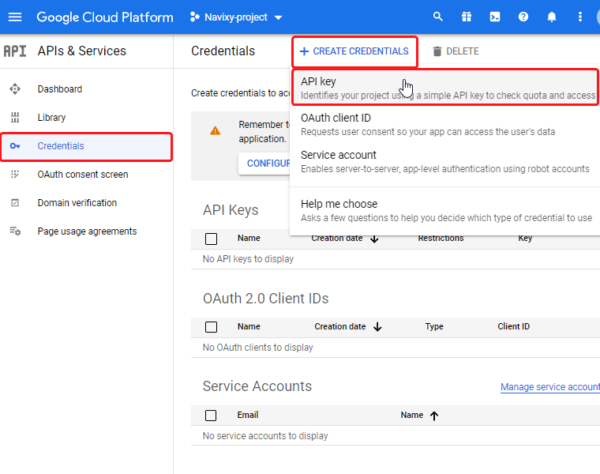
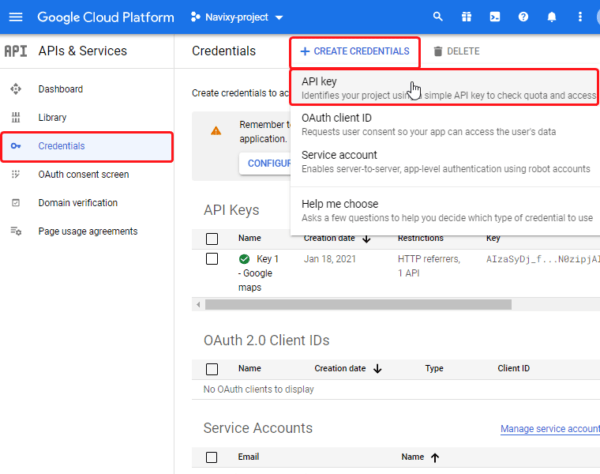
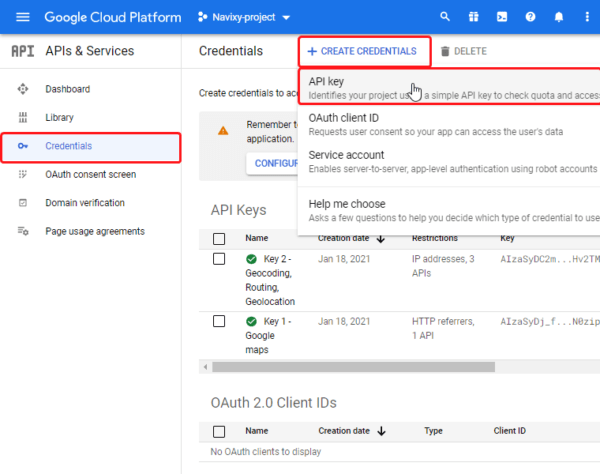
Go to Credentials tab
Press Create credentials and select API key
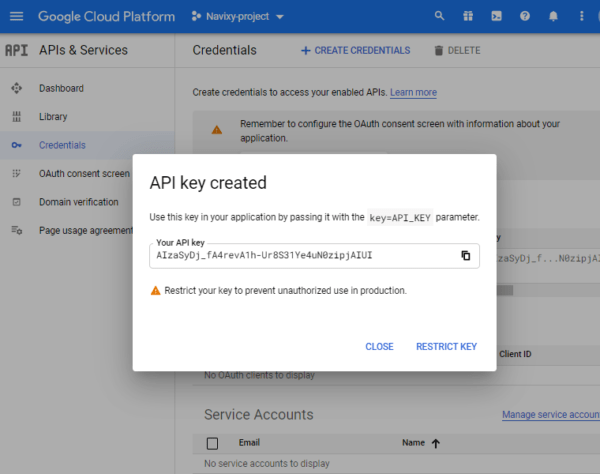
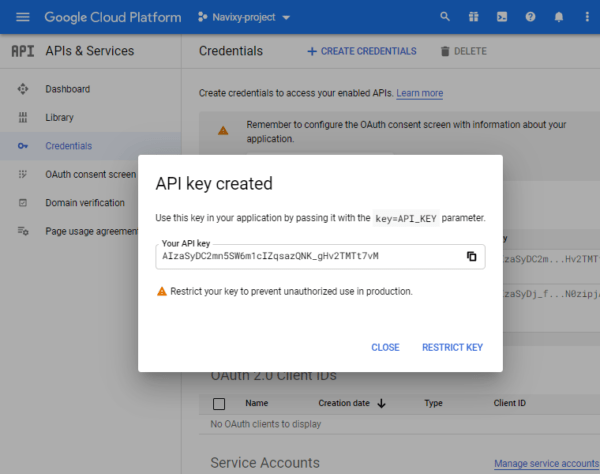
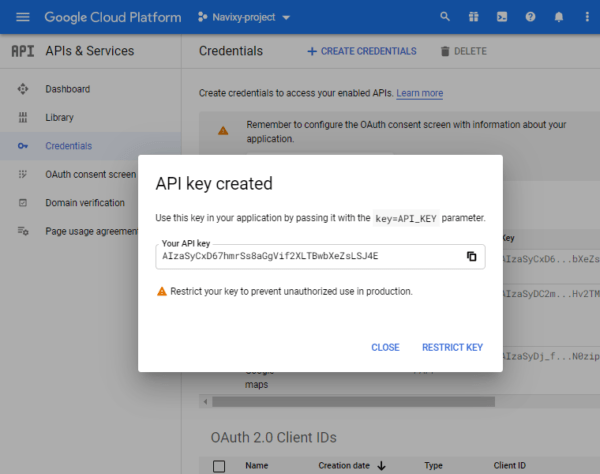
Key will be displayed in a new window
Press Restrict key to make changes, you will be taken to a setup page
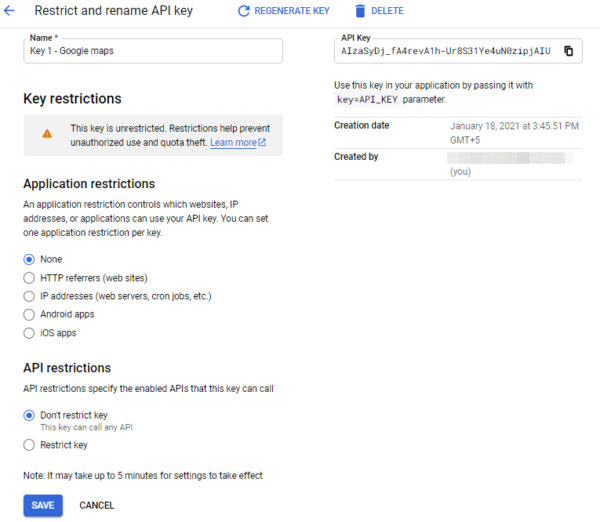
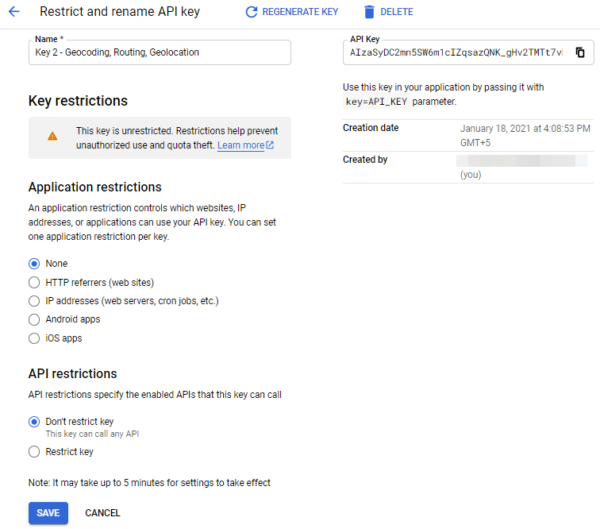
Name the key so would be easier to distinguish it from others
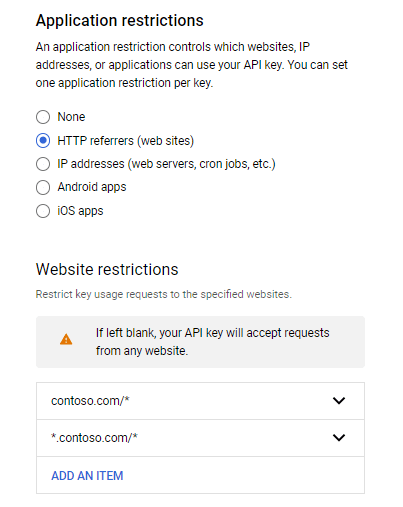
In Application restrictions select HTTP referrer and specify the domain you use for the platform. E.g contoso.com/* gps.contoso.com/*
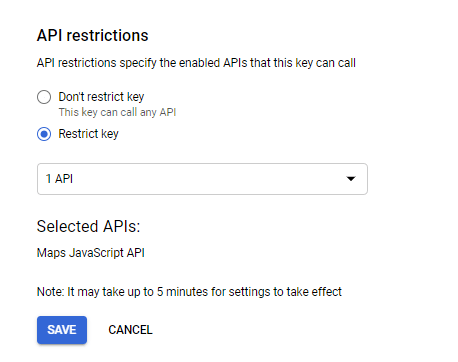
In API restrictions select Restrict key and choose Maps JavaScript API
Press Save to apply the changes

Generating Google Key #2 for Geocoding, Routing and Geolocation
Go to Credentials tab
Press Create credentials and select API key
Key will be displayed in a new window
Press Restrict key to make changes, you will be taken to a setup page
Name the key so would be easier to distinguish it from others
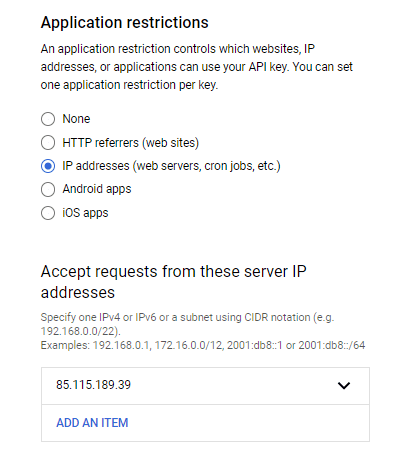
In Application restrictions select IP adresses and specify public IP of your server
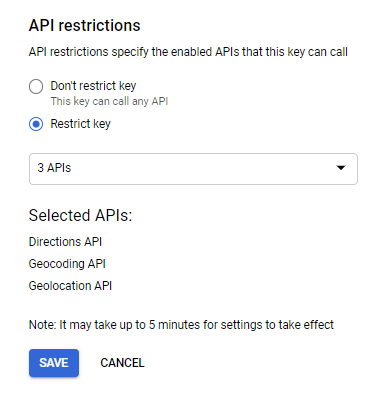
In API restrictions select Restrict key and choose Maps Geocoding API, Maps Geolocation API, Maps Directions API
Press Save to apply the changes
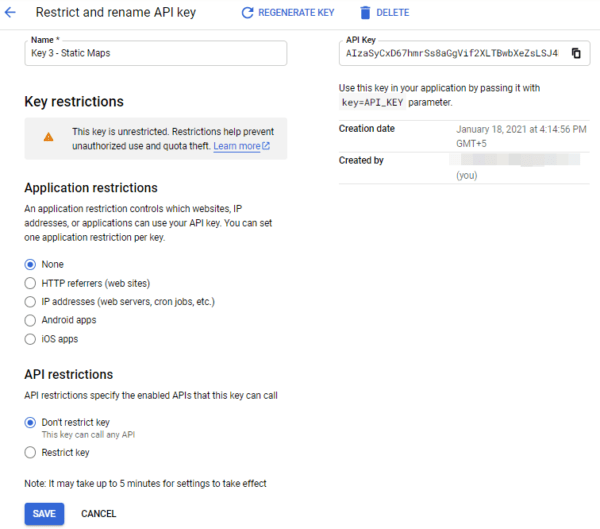
Generating Google Key #3 for Static maps in email notifications
Go to Credentials tab
Press Create credentials and select API key
Key will be displayed in a new window
Press Restrict key to make changes, you will be taken to a setup page
Name the key so would be easier to distinguish it from others
In Application restrictions select HTTP referrer and specify the domain you use for the platform. E.g contoso.com/* gps.contoso.com/*
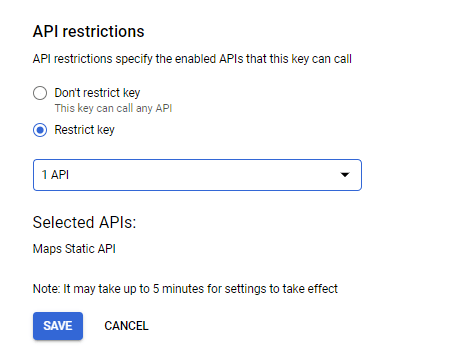
In API restrictions select Restrict key and choose Maps Static API
Press Save to apply the changes
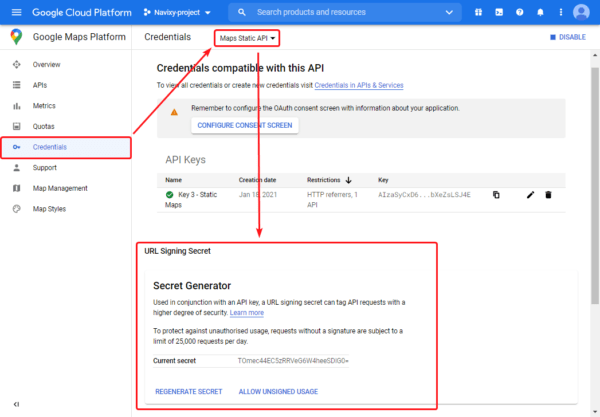
For the Google key #3 you will also need an URL signing secret. Please refer to the guide below to generate a URL signing secret for your Static maps key:
Go to the Dashboard
Scroll down to list of APIs and click on Maps Static API
You will be forwarded to a new page.
Click on Credentials menu
Check that Maps Static API is selected
Scroll down to URL signing secret to see your current one.
Applying Google Maps API keys
As described above, we recommend generating three Google Maps API keys and assign the following Google API services to them:
Google Maps API key #1 – should be restricted by HTTP referrer, which is your user interface URL:
Google Maps JavaScript API
Google Street View Image API
Google Maps API key #2 – should be restricted by server IP:
Google Maps Geocoding API
Google Maps Geolocation API
Google Maps Directions API
Google Maps API key #3 – should be restricted by HTTP referrer, which is your user interface URL:
Google Static Maps API (you also need URL signing secret for this key)
All three keys will be stored in the database. They should be inserted into table dealer_service_credentials of google DB with the following query:
INSERT INTO dealer_service_credentials (dealer_id, service_type,credentials) VALUES (1, 'google', '{"maps_js_api_key":"FIRST_KEY_HERE","server_api_key":"SECOND_KEY_HERE","static_map_api_key":"THIRD_KEY_HERE", "static_map_crypto_key":"URL_SIGNING_SECRET_HERE"}';If you don't want to use Google Maps for certain services, you can omit the keys that you don't need from the query. For example, use this query to apply the third key only:
INSERT INTO google.dealer_service_credentials (dealer_id, service_type, credentials) VALUES (1, "google", '{"static_map_api_key":"THIRD_KEY_HERE", "static_map_crypto_key":"URL_SIGNING_SECRET_HERE"}');Restart the services
restart-navixy